PHP & MYSQL TUTORIAL/PROGRESS BLOG
Comments/Guest Book
PAGE 4 "Creating and Retrieving MySQL Data (2)"
Comments/Guest Book
PAGE 4 "Creating and Retrieving MySQL Data (2)"
Creating HTML form
Below is the html I used for creating the table which is used to enter data to be added to the form.
The easiest way to understand all this is to look at it a few times and then try making some changes. Try changing the look of the form as well as how the information is displayed once it is submitted.
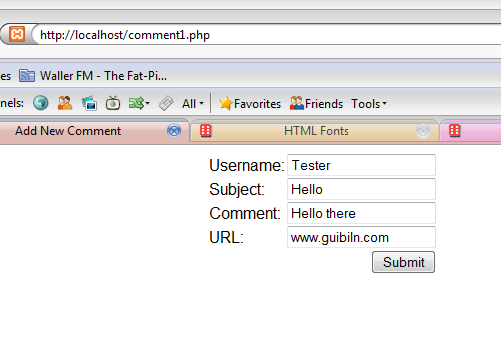
The images below show how it should look (yes I spelled my own surname wrong)


Below is the html I used for creating the table which is used to enter data to be added to the form.
<table width="200" border="0" cellspacing="0" cellpadding="1" align = "center">The 'id' is what the php code looks at and gets the data from. The finished php file for the file looks like this:
<tr>
<td width="100">Username:</td>
<td><input name="username" type="text" id="username"></td>
</tr>
<tr>
<td width="100">Subject:</td>
<td border = "0"><input name="subject" type="text" id="subject"></td>
</tr>
<tr>
<td width="100">Comment:</td>
<td><input name="comment" type="text" id="comment"></td>
</tr>
<tr>
<td width="100">URL:</td>
<td><input name="url" type="text" id="url"></td>
</tr>
<tr>
<td width="100"> </td>
<td align = "right"><input name="add" type="submit" id="add" value="Submit"></td>
</tr>
</table>
<html>Note that the entire php section is placed within the html tags. However, the file must still be saved as a php file for it to work. Ensure that the id's in the html section towards the end are the same as the values for the defined variables such as $Name, $Subject etc. I have emphasized these in bold.
<head>
<title>Add New Comment</title>
<meta http-equiv="Content-Type" content="text/html; charset=iso-8859-1">
</head>
<body>
<?php
if(isset($_POST['add']))
{
$dbhost = 'localhost';
$dbuser = 'root';
$dbpass = '';
$conn = mysql_connect($dbhost, $dbuser, $dbpass) or die ('Error connecting to mysql');
$dbname = 'test1';
mysql_select_db($dbname);
$Name = $_POST['username'];
$Subject = $_POST['subject'];
$Comment = $_POST['comment'];
$URL = $_POST['url'];
$query = "INSERT INTO example1 (Name, Subject, Comment, URL) VALUES ('$Name', '$Subject', '$Comment', '$URL')";
mysql_query($query) or die('Error, insert query failed');
$query = "FLUSH PRIVILEGES";
mysql_query($query) or die('Error, insert query failed');
echo "Comment Added <br><br>";
$query = "SELECT Name, Subject, Comment, URL FROM example1";
$result = mysql_query($query);
while($row = mysql_fetch_array($result, MYSQL_ASSOC))
{
echo "----------------------------------- <br>" .
"Name: {$row['Name']} <br>" .
"Subject: {$row['Subject']} <br>" .
"Comment: {$row['Comment']} <br>" .
"URL: {$row['URL']} <br>";
}
mysql_close($conn);
}
else
{
?>
<form method="post">
<font size="1" face="Arial">
<table width="200" border="0" cellspacing="0" cellpadding="1" align = "center">
<tr>
<td width="100">Username:</td>
<td><input name="username" type="text" id="username"></td>
</tr>
<tr>
<td width="100">Subject:</td>
<td border = "0"><input name="subject" type="text" id="subject"></td>
</tr>
<tr>
<td width="100">Comment:</td>
<td><input name="comment" type="text" id="comment"></td>
</tr>
<tr>
<td width="100">URL:</td>
<td><input name="url" type="text" id="url"></td>
</tr>
<tr>
<td width="100"> </td>
<td align = "right"><input name="add" type="submit" id="add" value="Submit"></td>
</tr>
</table>
</font>
</form>
<?php
}
?>
</body>
</html>
The easiest way to understand all this is to look at it a few times and then try making some changes. Try changing the look of the form as well as how the information is displayed once it is submitted.
The images below show how it should look (yes I spelled my own surname wrong)


No comments:
Post a Comment