I've been doing some more work on my website and have now programmed it so different sections appear in the correct pages by looking up in the database the relevant data.
http://www.colinjensen.co.uk/~gibboco/index.php?pg=home
Showing posts with label home project. Show all posts
Showing posts with label home project. Show all posts
Thursday, September 25, 2008


Monday, September 22, 2008
C# Event Handling
In an attempt to broaden my programming skills, and more specifically my C# skills, I have been learning how to create event listeners with Visual C#. I am learning how to recreate the interface in my flash version of wizED (which I still havn't uploaded yet, I am going to work on a webpage to put it, and the finished game on soon).
Here are some sites I have been looking on for the information:
http://articles.techrepublic.com.com/5100-10878_11-1050284.html This is nice and basic, starting from how events are added when you add a control to the form, etc.
http://articles.techrepublic.com.com/5100-10878_11-1053743.html?tag=rbxccnbtr1 This article follows on and goes into more depth about custom added events, dynamic events etc
http://secure.codeproject.com/KB/cs/event_fundamentals.aspx - goes into more depth about delegates and dynami event handling. A lot to read, but useful.
Update: although I understood the concept, I was still struggling getting a click event to work until I came across this page which made it really reallly simple: http://www.csharp-station.com/Articles/EventHandlingInCSharp.aspx
And then this to go into more detail: http://msdn.microsoft.com/en-us/library/aa289500(VS.71).aspx
Friday, September 19, 2008
Tomb Raider 4 Level Editor
I could have kept all three of today’s posts in one but I want to organise things into their correct categories.
I decided I wanted to do some more 3D level designing, but hadn’t really enjoyed working with Unreal Editor as much as I had hoped. I think maybe because of its genre of pc shoot ‘em up which I have never been much of a fan of. I enjoyed working with unrealEd in the way that it allowed me to explore and play around a 3D world which I had designed. Maybe it was just my inexperience with the game, the editor and the genre in general which left me feeling less than excited about the whole thing.
Anyway, yesterday I was thinking back to one of the first times I remember thinking how cool it would be to make games, and it was back probably ten years ago or so, maybe even more, when in PC Gamer or some other PC Games magazine there was an interview with someone who worked as a level designer for the Tomb Raider games. I remember there was a screenshot of the level editor of some kind which showed part of an unfinished level and (as geeky as it sounds) found the idea of playing around with the levels of Tomb Raider a really fun idea.
So I typed in Tomb Raider Level Editor, not really expecting there to be one, but was happily surprised when I found ‘Tomb Raider 4 Level Editor’ Yay :D
I have only had a quick look at it and followed a very basic tutorial which came along with it. It looks very nice though and I will hopefully get round to creating a proper level with the feel of a real Tomb Raider game at some point, but I think I’ll need to sit down and spend more time and effort on it. Unfortunately there doesn’t seem to be any concept within the editor of importing static meshes to place within the level so this is sort of limiting, but I still think it will be a good way of getting some level design experience, as well as creating and importing textures to use within the levels.
There is also some good stuff on level design in the PDF by Phillip Campbell, a level designer for the Tomb Raider series about the structure of levels as well as giving examples of things he has done in his own levels.
Some screenshots of the level editor and the game running the level (I know it's terribly textured but it still cool).


Programming Lessons
Today I have been looking into using event handlers/listeners in C#
Websites I have looked at:
I am hoping to create a C# version of the level editor for my flash game 'Wizards' so trying to improve my C skills a bit. Also been looking up classes and some other stuff, no examples of any working code yet though.
Wednesday, September 17, 2008
3D Work Update
Before I started getting on with the Wizards 2.0 project, I was jumping back and forth between different things I wanted to get done over the summer including some 3D design, some level design, web design, a comic, etc etc. I then got obsessed with the Wizards game for almost a week, but I am taking a break from it for a bit, so I thought I would do a quick update of other stuff I have been working on.


Monday, September 15, 2008
WizED 1.1 (for Wizards)
Instructions for the editor for my flash game Wizards (WizED v1.1)
I am putting this in my blog as I don't have a website for the game set up yet, though I should do shortly. As the editor (along with the game) have been quite rushed, and since it has all been a learning experience, programming things I have not attempted before, things will not all run perfectly. I have made no attempt at error handling as of yet. If a problem arises, the game will most likely crash.
I know this game isn’t perfect, but I have worked hard on it and have learnt quite a lot (mainly that I need to learn better ways of doing things) and I hope you enjoy trying it and messing around with the editor. I know there are problems with it, and I know it can be frustrating, but I would really appreciate any useful criticism and ideas on how to improve the game and the editor. I will be working on updates now and again so hopefully the game will begin to improve over time.
The Editor
With some objects, such as the collectable stars, and mover objects, once they are placed, there is no way of removing them without starting the level design from scratch (restarting the editor). Mover objects can be drawn over with the blank tile, but this will not actually remove it from the level.
Unfortunately, for now anyway, once you have clicked the 'make' button, you will not be able to go back and edit your level using the level editor. Also, there is no way as of yet for importing levels to edit using the editor. This is something I will be adding in the next version. So before you click 'make', ensure that the level is exactly how you want it.
Block Brushes
The normal tile brushes are very easy to use and work well. Simply choose the tile (there are three different tiles available in this version of the editor, and four unused ones (red/other colours). There is also the blank tile (which has a red line through it) which is used for removing tiles you have placed. Once you have selected your tile, click and drag around on the map to place the tiles down. You can place as many tiles as you like without slowing down the game any considerable amount. If you go wrong, use the blank tile. You can use the red tiles if you wish, they will just show up as they do on the editor when playing the game (in the current version at least).
Collectable (small) Stars
The small stars are the collectable items in the game. You must have at least one of these on your map somewhere or the 'make' button wont function. Ensure that you put the stars in places that are reachable by one of the characters (in Wizards v2.2, characters can jump approximately 4 blocks high. This may vary in later versions of the game). The star brush icon is small so look at the output box at the bottom left of the screen to ensure it reads ‘Star Brush’ before clicking on the map. You can only place one star at a time, and only one in each box. In v2.2, stars are always placed in the bottom left of the box (again, may vary in later versions). Be careful placing stars as they cannot be removed in the editor. Although stars do not have to be reachable for the ‘make’ button to function, the level exit stars will not appear until all of the smaller stars have been collected in the level, meaning the level will not be completable.
Also be careful with the amount of stars that you place, as they can start to slow the game down considerably.
Exit Stars
A level can only have, and must have two exit stars to be able to use the make button, and for the game to load it. Ensure the stars are reachable by the characters (at the same time) to make the level completable. Although you cannot directly remove exit stars, if you have the exit star brush selected and click on the map when two exit stars already exist, then both exit stars will disappear.
Mover Blocks
Mover blocks are the big pain with the game and the editor. These need a lot of work until they are fully usable within the game. To create a moving block, click the red block to the right of the large star at the top of the screen. The output text will read ‘Mover Block. Select a tile type’. Although you must select a tile type, this is completely irrelevant as all blocks appear as block type 3 (the four brown blocks). Once a tile type has been selected, type in a number in both the text boxes beside the mover brush. The top number refers to how many blocks above the selected one the mover block will move up to, and the bottom number how for the mover block will move down to. There is no cap on the number you can enter, though errors will probably get thrown back at you if you type huge numbers (I’ve not tried).
When moving blocks move at different heights to each other, the character gets confused when landing on one and starts jumping up and down on the lower ones. This is annoying and unplayable, so I advise having all moving blocks at the same height.
There is nothing stopping a mover block moving down from the top screen to the bottom screen or vice versa. I don’t think that I have actually implemented the ability for the bottom character to use mover blocks, but this will definitely be added in the next version. As stated before, mover blocks cannot be deleted using the editor.
Editing with Text Editor
If you really want to edit the level after you have created it and found something isn’t working right, then it IS possible to open the xml file in a text editor and make changes. If you are deleting a star or mover item, ensure that you edit the ‘starNum’ and ‘moverNum’ tags near the start of the file relevant to the changes made.
When you press the make button, assuming no errors come up, the xml data for the level will appear in a text box. The text is automatically copied to the clipboard so just open up your text editor and paste it in (the file may look a bit odd but don’t worry). Save it in the Levels folder as an xml file (e.g. myLevel.xml). Now when you run Wizards2_2.exe (from the same file as the Levels folder sits) just type in ‘Levels\myLevel.xml’ or whatever you have saved it as in the text box and click ‘Load’ to start your level.
Saturday, September 06, 2008
[XML] Loading level layouts into tile based Flash Game
Introduction
I am starting the XML stuff for my wizards game from scratch. Yesterday after trying several methods of getting multiple levels to load, I found out about using XML to load in data to a flash file. I used several websites to help me understand the concept (Emanuel Feronato,8 Bit Rocket and by far the most useful and easy to understand, Kirupa).
Anyway, thinking I had learnt completely how to use it, I dived straight in to adding the code into my project. This sort of worked. I am still unsure why it DIDN'T work completely. I managed to load in the level and display it on the screen, but I couldn't work out why it wasn't showing properly (the tiles were all the same, as oposed to showing the correct tile based on the number in the XML file).
So, this is my blog of doing all the XML walkthrough stuff in a blank project, without any of the other code or anything else confusing me. It's also sort of a tutorial, so follow it if you like. It may not be the best way of doing the thing I am trying to acheive, but I will try and explain what I am doing as I go along.
Tuesday, August 05, 2008
Linux, Virtual Machines and Gnome Themes
I decided I wanted to play around with Linux a bit, but wanted it on my desktop machine instead of my laptop which currently is running OpenSuse. However, I didn't want to partition my windows machine, wanting to be able to move back and forth between Linux and windows quickly and easy. I searched online to see if it would be possible to run linux from within Windows.
After searching about, I found two peices of software, VMWare and Sun xVM VirtualBox. I tried VMWare first but I couldn't see any way of booting off a linux ISO (which is how I wanted it to run, having a Suse Linux iso on my computer still from when I downloaded it to put onto my laptop). Maybe I missed something, but then I downloaded Virtual Box and this was much clearer how to use it. Linux installed as normal, but from within a window in Windows Vista. The best thing was I could get on with using my computer whilst waiting for Linux to install. Once it had installed I have been able to run linux as though it was booting directly into linux, and I have had no problems with it yet.
I wish I had descovered this software sooner, as I have often installed linux onto computers when I have become bored of Windows, but then miss the none linux compatable software which I need to use for uni projects, home projects, etc. Anyway, this software is very nice, and it is free (and not just a trial version as far as I can tell), plus it is legal and easy to download full linux ISO's which you can install from, which also contain most of the software you could need. I highly recommend it to anyone who wants to try out linux, or would like to use linux, but don't wish to switch 100% away from Microsoft. You can also try out multiple versions of linux as well as other operating systems, such as older versions of windows, DOS, etc.
Some links:
Virtual Box Website
Suse Linux Desktop 10 VMWare (for use with virtual desktop applications)
Installing linux while getting on with some 3D design work:

Once I had installed Linux and played around a bit I decided I wanted to try my hand at creating a theme for the gnome desktop environment. After looking around on the internet and at the existing gnome themes, I realized it was going to be easiest (for me) to make a theme based on the 'Crux' theme, which is mostly image based and so wouldn't involve so much messing about with numbers and finding out what each style was referring to.
Some screenshots of the theme: (graphics created in gimp)


After searching about, I found two peices of software, VMWare and Sun xVM VirtualBox. I tried VMWare first but I couldn't see any way of booting off a linux ISO (which is how I wanted it to run, having a Suse Linux iso on my computer still from when I downloaded it to put onto my laptop). Maybe I missed something, but then I downloaded Virtual Box and this was much clearer how to use it. Linux installed as normal, but from within a window in Windows Vista. The best thing was I could get on with using my computer whilst waiting for Linux to install. Once it had installed I have been able to run linux as though it was booting directly into linux, and I have had no problems with it yet.
I wish I had descovered this software sooner, as I have often installed linux onto computers when I have become bored of Windows, but then miss the none linux compatable software which I need to use for uni projects, home projects, etc. Anyway, this software is very nice, and it is free (and not just a trial version as far as I can tell), plus it is legal and easy to download full linux ISO's which you can install from, which also contain most of the software you could need. I highly recommend it to anyone who wants to try out linux, or would like to use linux, but don't wish to switch 100% away from Microsoft. You can also try out multiple versions of linux as well as other operating systems, such as older versions of windows, DOS, etc.
Some links:
Virtual Box Website
Suse Linux Desktop 10 VMWare (for use with virtual desktop applications)
Installing linux while getting on with some 3D design work:

Once I had installed Linux and played around a bit I decided I wanted to try my hand at creating a theme for the gnome desktop environment. After looking around on the internet and at the existing gnome themes, I realized it was going to be easiest (for me) to make a theme based on the 'Crux' theme, which is mostly image based and so wouldn't involve so much messing about with numbers and finding out what each style was referring to.
Some screenshots of the theme: (graphics created in gimp)


Tuesday, July 22, 2008
3D Character and object design
Although I have been mainly in a website/programming mood lately and concentrating on getting a website made, I have also been doing some small bits of 3D design in between.
Below are some images of drawers/filing cabinets I started making for possible use in the game concept I was working on, but haven't got very far on. These would also be usable as generic furniture objects for use in other projects.
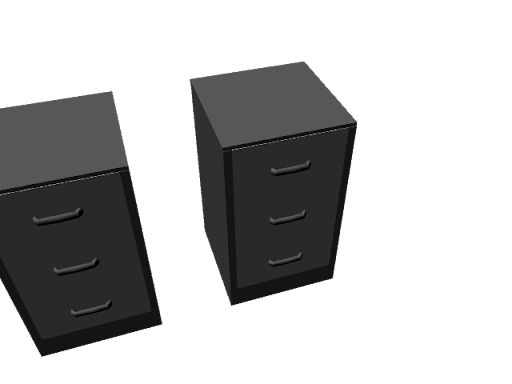
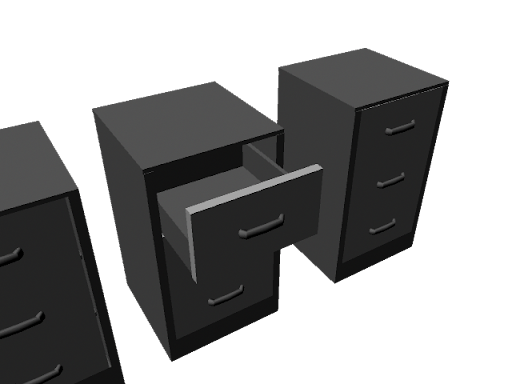
I've not added any textures to them yet, which is what I really should be working on over the summer, and I will eventually do some texturing, but for now they're alright in gray.
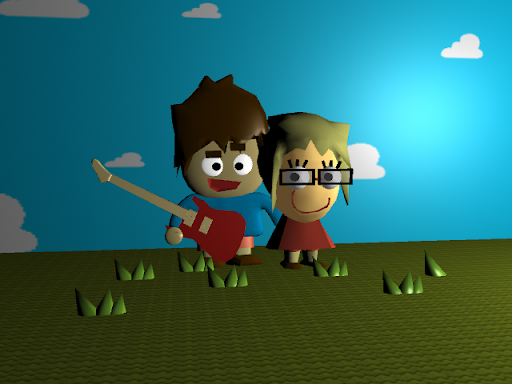
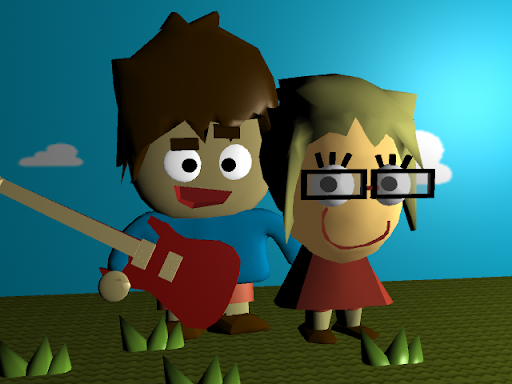
As well as this I worked on some 3D cartoon models I had created before, for an first anniversary card for my sister and her husband.
Below are some images of drawers/filing cabinets I started making for possible use in the game concept I was working on, but haven't got very far on. These would also be usable as generic furniture objects for use in other projects.
I've not added any textures to them yet, which is what I really should be working on over the summer, and I will eventually do some texturing, but for now they're alright in gray.
As well as this I worked on some 3D cartoon models I had created before, for an first anniversary card for my sister and her husband.
Friday, July 18, 2008
PHP (4) - Sorting By Date
PHP & MYSQL TUTORIAL/PROGRESS BLOG
Comments/Guest Book
PART 4 "Sorting By Date"
Comments/Guest Book
PART 4 "Sorting By Date"
The next thing I wanted to do was to be able to sort the information backwards, so the latest items of data appear at the top. Although I realized this would be possible to do by simply doing a descending sorting of the ID, I thought it would be more useful to sort descending by date as this is another piece of information that would be useful to provide on a comments page/guest book, etc.
Adding Date field into database table
This is done by going back into the phpMyAdmin front end and clicking the structure tab. Underneath the table is a bit that says Add (number) field(s) At End of Table/At Beginning of Table/After (field name). Since it is more organized to keep the ID as the first field, choose After, and the field name you want it to be after (ID in this case). Name the field 'Date' and select type as 'Date' too. Save this then go back to the php file.
Writing the date into the database
All you need to do in the php is add 'Date' into the list of fields you are adding to and 'CURDATE()' as its associated value. The line should look like this:
$query = "INSERT INTO example1 (Date, Name, Subject, Comment, URL) VALUES (CURDATE(), '$Name', '$Subject', '$Comment', '$URL')";
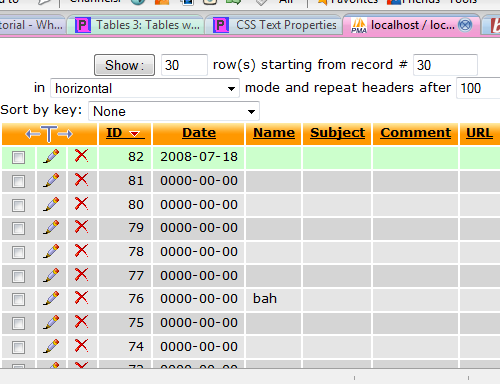
Save the file and open it from within Firefox. Press submit and then if no errors appear, go back into phpMyAdmin and click the Browse tab, where you should see the date stored in the most recent Id's date field (click ID to make the ID list descending so the newest is at the top).
Information/help from:
page resource
electric toolbox
Tiz Taz
©Chris Guiblin 2008
URL: www.guiblin.com/chris/
EMAIL: chris@guiblin.com
Thursday, July 17, 2008
PHP (2) - MySQL Database
PHP/MYSQL TUTORIAL/PROGRESS BLOG
Comments/Guest Book
One thing I like about XAmpp is the built version of phpMyAdmin, which is an easy to use front end for MySQL. This can be accessed by going to "http://localhost/xampp" and following the link to phpMyAdmin under the tools section of the left hand navigation, on the XAmpp front page (http://localhost/phpMyAdmin).Comments/Guest Book
Xampp phpMyAdmin
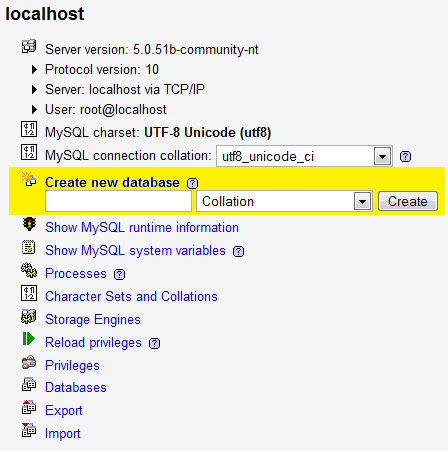
CREATING A NEW DATABASE
A new database can be created easily using the Create new database field:
CHOOSING TABLE NAME AND NUMBER OF FIELDS
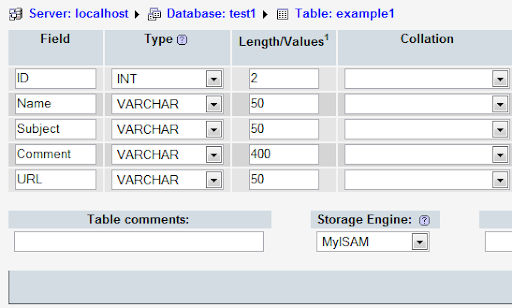
I have named my database "test1", on the next page choosing "example1" as the new table on the database. I chose five for the Number of fields (different bits of information that will be entered into the table). When creating a database it is best to plan what information is going to be entered into the table and entering the Number of fields accordingly. Both the database and table name should be relevant to what it is going to be used for so you can remember what is what when you have multiple databases and tables.
FIELD NAMES, TYPES AND LENGTHS
For this Database table I chosen field names which would be used on a comments page or guest book; Name, Subject, Comment and URL, as well as ID which will be the comments number (1 for the first comment, 2 for the second, etc). I have set the field type for ID to INT, with the others as VARCHAR. For the Length/Values, I have chosen numbers which I think will be about right for these field inputs.
I have also chosen for the ID field to be set to 'Primary' and 'auto-increment', which makes it the primary field as well as automatically increasing the number in the field as required for the ID field. Choose the Collation you want (chosing none defaulted to latin1_swedish_ci for me, so I chose to use ucs2_bin).
CONNECT TO DATABASE WITH PHP
Now to the coding. Bring up your text editor and enter the following:
$dbhost = 'localhost';
$dbuser = 'root';Things you may have changed which may be causing you problems: If you have set up a username and password for your database, change these accordingly under "$dbuser = " and "$dbpass = ". Also, if you didn't call your database "test1" then type whatever you did call it under "$dbname = ". Also ensure there are ";"'s at the end of every line where it is needed.
$dbpass = '';
$conn = mysql_connect($dbhost, $dbuser, $dbpass) or die ('Error connecting to mysql');
$dbname = 'test1';
mysql_select_db($dbname);
?>
Save this file as a php file (I named mine connectphp.php) in C:\xampp\apache\htdocs (or the relative location if you put it somewhere else). Access the page in your web browser (http:\\localhost\connectphp.php in my case) and it should be blank, which is a good sign that it hasn't caused an error.
Information/help from:
Collin Jensen
php.net
php mysql tutorial
©Chris Guiblin 2008
URL: www.guiblin.com/chris/
EMAIL: chris@guiblin.com
PHP (1) - Hello World
Introduction
For this tutorial bog I am using Xampp running all the available services included with it on a home computer not running as a web server. Most of the information is going to be the same whether or not you are using Xampp. One thing to note is that not all webspace providers support php and mysql. If you are using a service like this, check whether php and mysql are supported with them before attempting any sort of php /mySQL project.
This tutorial is as much a documentation of what I am doing than teaching how to do it. Although I have some previous experience with web servers, programming and a very small amount with PHP and mySQL, this is a learning experience for me, I just thought it might be useful to write how I am doing it, for anyone else who might be attempting this and has come across this page. If you spot anything wrong then please send a comment or email me and I will check it out.
DOWNLOAD AND INSTALLATION (windows)
Firstly, install XAMPP from
http://www.apachefriends.org/en/xampp.html. I first tried the ZIP file
and tried installing the windows version on my computer. However this
failed, I think because I am using vista and the version wasn't made
for that. So probably best using the installer. Follow the installation
(don't install to program files if in vista, as it will tell you),
enabling the services you want. You must enable php for the above to
work. I have installed everything as I will be dabbling with mysql and
possibly other services later on.
VIEWING/EDITING THE INDEX PAGE
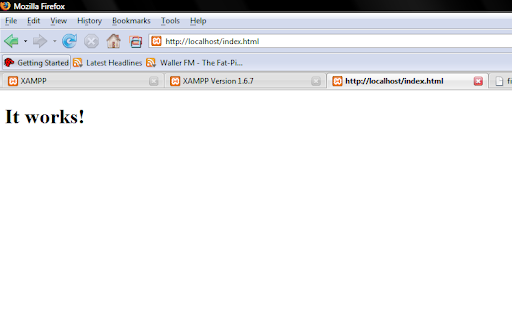
In your web browser go to "http://localhost". This brings up
the yellow and orange xampp page with information and demos, etc. This
will take you to "http://localhost/ampp". Change it to
"http://localhost/index.html to view the index page, which will display
the text "It works!"
To get to where this page is actually stored in your computer,
go to the directory where you installed Xampp ("C:\Xampp" in my case).
You should see a folder named "htdocs". This is where the pages are
stored which will actually be accessible through the web server. In
here you will find a file "index.html", which is the page displayed
when you go to "http://localhost/index.html".
To edit the content of the page, open the file with notepad,
dreamweaver, or any other text editor/web design software. If you don't
understand any of what has come up, you should probably go searching
Google for help or buy a book on basic html. All you need to do to
change the text on the page is to change the text between the
the file in a few ways to make it work using php. Php in itself is not
built into browsers like html is, therefor it is up to the server to
deal with the php code, and that is why php needed to be installed as a
service earlier.
the command "echo" which just means to display the value of something.
In this case you just want to display a string value, so you just need
to type the following:
<?phpnotes: you must put ";" at the end of echo "Hello" to show
echo "Hello";
?>
that this is the end of the line of code, and to allow the action to be
performed.
Information/help from:
Collin Jensen
php.net
php mysql tutorial
©Chris Guiblin 2008
URL: www.guiblin.com/chris/
EMAIL: chris@guiblin.com
Wednesday, June 18, 2008
Game design concepts
I am currently working on designs for the start of a game idea I hav come up with. The aim is to create a realistic looking, believable futuristic setting. I am concentrating on one building for now, the home of the main character, and on the designs of individual bits which give the feeling of a futuristic setting. This includes showing advanced technologies suh as animated wallpaper and digital displays projected on many surfaces such as walls, mirrors and windows. I will work on transparency and animated textures in maya and the unreal engine to achieve these effects. Currenlythese advanced features are just conceptual and I have not yet implimented them into any software yet.
I will also look into the use of programming within unreal to see if it going to be an achievable goal to have the character interact with the differnent displays to effect different parts of the room. If this is not going to be easily achieved then I will simply code a GUI in C showing how the system would work, and havedifferent preview screens within the program showing how the displays would change the look of different rooms.
I would also like to experiment with scripting in unreal and the creation of objects which can be picked up and used to solve puzzles etc. Dialogue/Monologue would also be important in the sort of adventure game I wiso create/demonstrate. If this is not easily achieved in unreal then again I wll look at other methods of demonstraingtis in C or actionscript.
As I am going away for a week or so, I wl justbe working on more concepts and designs before creating anything more in maya and unreal. I will scan in some designs at a later date date as well as get some screenshots of what I have done already (I'm not on the right computer at the moment to get anything like that).
I will also look into the use of programming within unreal to see if it going to be an achievable goal to have the character interact with the differnent displays to effect different parts of the room. If this is not going to be easily achieved then I will simply code a GUI in C showing how the system would work, and havedifferent preview screens within the program showing how the displays would change the look of different rooms.
I would also like to experiment with scripting in unreal and the creation of objects which can be picked up and used to solve puzzles etc. Dialogue/Monologue would also be important in the sort of adventure game I wiso create/demonstrate. If this is not easily achieved in unreal then again I wll look at other methods of demonstraingtis in C or actionscript.
As I am going away for a week or so, I wl justbe working on more concepts and designs before creating anything more in maya and unreal. I will scan in some designs at a later date date as well as get some screenshots of what I have done already (I'm not on the right computer at the moment to get anything like that).
Subscribe to:
Posts (Atom)